Friday, April 29, 2011

Faceting a Space Ship


One of our more active club members, Bruce, has recently gotten involved in gemstone faceting. You can often find him at the shop sitting in front of one of the faceting machines sliding his stone over the grinding plate and fashioning some of his arcane projects.


Bruce likes to do unusual designs for his stones instead of the same old thing. His current project when I was at the shop was taking clear pieces of quartz and shaping and polishing them into large faceted gemstones in the shape of space ships.


A closeup of one of his stones half way done shows some of the facet faces on the stone already polished and reflective while some of the other facet faces are still milky looking from lack of polish.


An end on view shows the likeness of the spaceship more clearly.

Monday, April 25, 2011

The San Diego County Council Tailgate - Amethyst Flowers


Inside one nice covered outdoor booth were many especially beautiful specimen types of stones but one type in particular caught my eye here. They were called 'amethyst flowers' and were large, about one foot or more in diameter, sprays of amethyst. Almost no bits of host rock were evident. It was all quartz. Some of the specimens had a bowl shaped pattern with steep sides, almost like the bottom of a bucket.

The one in the second photo was (if I remember correctly) over a foot across and was priced at $200.00 which I thought was very reasonable. Apparently, the amethyst flowers are found in layers of basalt and the flowers must be carefully taken out and then the basalt and matrix must be carefully removed from the flower using hand tools. Sounds very tedious!

The flowers appeared delicate but seemed surprisingly sturdy when handled. The proprieter of the booth looked only slightly nervous (and I don't blame him!) after telling me it would be OK for me to move the flowers around to gain better photos.

He was very nice to me and mentioned that he also did watch repair, and custom stonework for watch bands. I don't know of anyone else in the San Diego that does that. As a courtesy, I will include here a photo of his card and contact information for anyone who might be interested.

Friday, April 22, 2011

Austrian Finds HUGE Buried Treaure

What do you do if you are digging in your garden and instead of worms, you end up finding a big cache of buried gold, silver, and gemstone jewelry? Apparently, if you are one Austrian man, you throw the stuff into an old box, stick it in your basement, and forget about it for 4 years! Then I guess finally you see a bit of sparkle through the sluffing dirt and at long last you decide to show the stuff to the authorities who tell you the items are probably 650 years old and worth quite a bit of money!

But even after all that, the man was apparently not overly excited about the whole thing! Supposedly, there are about 200 items in the stash, but very few photos have been published. Hopefully, more will be coming soon. The items are indeed interesting looking and not of the style currently popular.

Wednesday, April 20, 2011

The San Diego County Council Tailgate - Hand Faceting Machine


While walking the aisles at the tailgate, my eye was quickly caught by a small machine on a table (click on photo for larger view). It was Bob Johnson's table, but a nice young lady was manning it and allowed me to take pictures of their hand faceting machine. I never knew such a thing existed! She was in the middle of cutting a stone, which she said was coming out well.

The small hand machine sits on the table with the stone at an angle against a polishing plate. Various polishing compounds can be added to various plates depending on what stage the stone is at. The machine has dials to set angles. The user sets the angle, chooses the plate and the drags and swirls the stone around the plate manually.

What struck me was that this machine would probably be quite a bit less in cost than your standard electric powered faceting machine. I was told this particular machine in the picture was purchased used for very little money. Since the tailgate show did not have electrical hookups to plug in a regular faceting machine, they were playing around with this little hand machine instead.

Looking on the internet, I do see there is a similar device available for $400 here, but I bet one of these could be found used for a lot less!

Sunday, April 17, 2011

The San Diego County Council Tailgate - Hypersthene

Last weekend, we had the County Council Tailgate show at the Vista Gas and Steam Engine Museum. The show is one big tailgate in a grassy field with all outdoor vendors, just the kind of show I like best. Low fees for vendor slots (just $20 per large slot) means that I will find lots of rough cutting material and the show will have more vendors oriented towards rockhounders. This is the third year for this show and I have been pleased as to how the show has evolved. I think this show is well on its way to becoming the best show in San Diego for rockhounders.

I am also pleased that in the second row of vendors, I found a rough material that I have been trying to find for several years now. Many years ago at Quartzsite, I found a scrap of a slab sitting in a bin of water. The slab was dark grey with lines of chatoyant banding. I love chatoyant rocks and had never seen this one before so I snatched it up and asked the vendor what it was. He said it was called hypersthene, which I had never heard of. He didn't know much about it but it was only $.50 which is my kind of price! I took it home and didn't work on it for quite some time. I figured it looked like crumbly metal and would probably be messy and not cab well, so I put off trying it. But eventually, I got to it and was surprisingly pleased with the results.

Cabbing it was not much of a mess after all. I had feared it would be something like the black morass that happens when cutting psilomelane but instead, it cut more like jasper, except softer. And only one small corner crumbled. The rest polished up nicely. Now I was in love with this stone and wanted more!

But I couldn't find it. Most places that touted they had it instead had what looked like low grade bronzite, or the hypersthene they did have lacked the chatoyant banding. A year later, I did find some slabs of it again at Quartzsite but the vendor wanted at least $30 per slab which seemed quite a lot! I wasn't ready to pay that much at the time, but as the months dragged by and still I could find no other source, I began to regret not having bought the expensive stuff when I could.

Until last weekend that is! One vendor had about 10 pieces of hypersthene there for $8 to $18 dollars. Some pieces lacked the the chatoyant banding so I skipped those and settled for 2 chunks and one slab. You can see a rough piece in the top photo, the slab in the middle photo, and you can see a pendant I made from my original tiny slab in the photo below. The pendant is denim lapis with 3 cabs of polished hypersthene.

I was told by the vendor, whom I foolishly did not get contact info for, that this hypersthene material comes from somewhere in Canada. Here's some of the technical info on hypersthene.

There were also many other neat things at the tailgate, many that I could not afford. And I spent a lot of time talking to vendors and learning things, which was just as fun. Need I mention again, this was my kind of show! I'll be going again for sure next year and in the following days/weeks, I will be posting about other interesting things I saw at the show.

Wednesday, April 13, 2011

Underground Mines Galore


Fields and acres of short yellow flowers covered the lower cow pocked hillsides as we headed North and East towards the Montezuma gold mining district. Higher up the mountain, light swirls and dustings of Styrofoam sleet balls sprinkled my hair as we searched, a biting chill wind testing my bones, but not quite enough falling ice to actually accumulate on the ground. We've taken this road to Montezuma many times before, but we have yet to explore all the region has to offer.


Along one dirt road, car sized blocks of pure glistening white marble can easily be seen. This area was once mined for marble but now only crumbling blocks of cement foundations remain in places where the marble blocks were once slid along cables to the main road.


In this same area, we often find small garnets. Recently, Dave found a nice pocket of large garnets and aquamarines, but this area is fickle. You might find a decent pocket right away or you might dig for hours and days and not find another. Today, we found very little other than a few very small garnets, one of which you can see in the photo.


Driving along one of the smaller brush covered paths, Dave also found a very large boulder hidden among the weeds which managed to apply a very large dent to the right underside of his jeep, just under the passenger side door. It also tore off a chunk of plastic moulding that was left to dangle precariously. But the damage looked to be all aesthetic, so we pressed on through the high shrubs.


Later in the day, the sun broke through the clouds, dissipating the sleet, and we drove to an area where many old gold mine tunnels can be found. And we were sure to explore as many as we could. The first one was entirely flooded, the water actually spilling out along the road and into a small river. We surmised that the excavation there probably opened a small spring that may run all year around, feeding the river beside it.

However, other mine entrances were higher and drier. In the photo, you can see Dave inspecting a large vein of white quartz inside one of the mine tunnels and in another photo, you can see a closeup of one tiny gold nugget present right there in the mine wall quartz (click on photo for larger view). Yes, squint very hard, it's that tiny speck! As often happens, the gold was present in areas of white quartz that had heavy iron staining (that reddish color on the quartz) and also dark almost bluish staining that indicates presence of other metals. Dave did his best to collect what nuggets he saw and those that did not accidentally fall onto the mine floor and become lost with the other dirt and rock have ended up in a small baggie for later inspection.

Many of the mines have preexisting denizens like rats that weave large nests from dried grasses, and bats that cling onto the walls and ceiling waiting for dusk to start their activities. As I zoomed in for a photo of one of the bats, my head brushing against the ceiling as I did so, I suddenly felt a small tickle on my ear and I jumped back, only to realize it was just Dave tickling my ear and not an actual bat. He was trying to mess with me and I guess he succeeded!

Bare in mind that all of these mine tunnels were pitch black inside. We all had small flashlights but for the most part, I could see very little. In order to take photos, I would just point and click and only later find out what showed up in the flash of light generated by the camera flash. Therefore, I was rather surprised in one flash photo to see that Sesame Pooch had turned into a glowing demon eyed chupacabra dog! But I guess she needed those x ray eyes to so blithely stroll around inside the mines with us, even though any other smart and sane dog would have had common sense enough to wait outside instead. I would have been nervous of her potentially falling into a vertical shaft, but some of us had been in these mines some years earlier, so we knew there were no dangerous drop offs present.

In the demon dog mine, the camera also found many orbs which are round circle things that seem to float in the air and usually only show up in camera photos. Orbs are either specks of dust or evidence of ghosts, depending on who you ask, but for whatever reason, there were hundreds of orbs in almost all photos from that one demon dog mine, but none appeared in any photos from any of the other mines. You can see some of the orbs in the demon dog photo.

Overall, the day was fun and the scenery beautiful. I even enjoyed the sleet as, being a California girl, I see such a thing only very rarely, and it did not interfere with our rock hunt. However, we did not find much take home rock this day. I guess I will just have to instead work on the tons I already have in my front yard!

Monday, April 11, 2011

Silver and Rhinestone Necklace

One of my latest little projects has been to redo a necklace that my mother found at a garage sale for a dollar. The original necklace had sterling silver round beads and long curved tube shaped beads strung onto a leather cord. We always like it when she can find sterling items for next to nothing, but neither of us cared much for how the necklace looked on us. In addition, the clasp was unreliable and would sometimes let loose after only a slight jostling.

We both felt the necklace needed a center piece but after trying multiple options that we already had on hand, we still could not find anything that really wowed us. Luckily, about a week later, my mother found an old moth eaten white dress in a thrift store for a few dollars. The dress was a mess but on the neckline was stitched an interesting rhinestone assemblage which my mother felt would look nice on the silver bead necklace. So she bought the dress and tore out the rhinestones and stitched them onto the necklace as a center piece. At this stage, I thought to take a photo which you can see at the top right. (Click on photo for larger view.)

We liked the rhinestones as a center piece but felt that overall, the necklace now lacked cohesiveness, so I invested a few more dollars to buy four rhinestone and sterling Swarovski rondelles to add in between the other beads in order to bring some of the rhinestone flash into other areas of the necklace.

Then there was the problem of the leather and unstable clasp. The solution was to restring. At first, we had hoped to use a sterling silver chain in place of the leather, several of which my mother had on hand from other lucky garage sale finds. And we had some additional silver beads on hand that we could cannibalize from another ugly silver bead necklace my mother had once picked up. However, the holes in the existing silver beads were very large and designed for a large thick type of cord. The end result was that on a small thin chain, the silver beads would flop erratically and not hang straight. A similar thing happened when I tried Soft Flex beading wire.

For a while, I was at a loss as to how to have the necklace strung as I desired while still having the big hole beads hang properly. But finally I came on the idea of using a big thick heavy gauge silver wire and stringing the beads onto that instead. Happily, I already had some on hand that I had bought previously with vague plans to maybe use it in a soldering project someday. The thick wire managed to hold the beads steady. At each end of the necklace, I bent the heavy gauge wire around itself to form two loops. In one loop, I put a large lobster claw clasp and the other loop would be the place the clasp would attach. The second photo shows the finished product.

The end result is a ridiculously glam mix of art deco sparkle meets native American rustic. But we like it.

Friday, April 8, 2011

Mooralla, Australia Smokey Quartz Fieldtrip

[Note: This article was reprinted with permission from the author, Bob Jackson of Geology Adventures.]

Some folks would say youʼd have to be mad to travel half way around the world to collect quartz crystals. I am crazy for quartz, particularly when the specimens in question are smoky quartz from Mooralla, Australia. Perhaps those same folks would say I could have ended the previous sentence after the 3rd word, but those folks would not be mineral collectors. Mooralla smoky quartz crystals are unique in the world. They somewhat resemble “Herkimer diamonds”, being doubly-terminated, extremely lustrous,and equidimensional.

The flight from Seattle to LA to Melbourne is long, but the November skies were smooth,and I managed to sleep for half of the LA-Australia leg, which departs LA late evening. This was my 12th visit in 20 years, so I knew what to expect. My last flight there was on United, which seemed to have had its seats designed by a pickle-packer, so I took my chances with a new airline, VAustralia, the newest of Bransonʼs Virgin-clones, and was pleasantly surprised. Arriving relatively refreshed, I gathered my bags and caught a bus to Ballarat, the eastern-most point of the Aussie Golden Triangle, the equivalent of Californiaʼs Mother Lode country. My old friend Doug met me there with his ʻuteʼ (pickup truck) for the 3 hour drive to Mooralla.

Mooralla is the name of a station, the Aussie equivalent of a ranch. The original station comprised over a thousand acres, but the digging area is set aside as a public ʻfossickingʼ (rockhounding) area. Australiaʼs mining laws are quite different than our US laws. All mineral rights are held by the government, including those on private land. The original station owner of Mooralla found smoky quartz crystals on the surface while tending sheep, and told a neighbor, who filed a mining claim on it. Claims of interest to fossickers can be turned into permanent public collecting areas, which is what happened at Mooralla. So this formerly private land is now set aside for fossicking and is one of the Aussie destinations for rockhounding tours led by yours truly for GeologyAdventures.com.

Our camp is in the bush, about an hour south of the nearest country town, so once there, we settle in for a month. My tour business causes me to spend about a third of every year camping out ... Mooralla is a most comfortable camp. I reside in a tent, Doug has a trailer outfitted with frig and freezer, so on our way in we fill the ute with frozen food and beer. Evenings at Mooralla are sublime: dinner cooked on the barbie, collectors cooked by the sun cooling off with a cold one, hot water for a shower warming in a bucket, kookaburras laughing and cockatoos scolding as the sun sets behind gum trees.

Doug arrived at Mooralla a week before I did, and had set up camp and gotten a hole started. The hole-starting process involves putting up a 20 X 20 ft. tarp, for sun and rain protection, and slicing chunks of clay out of a 10 X 10 foot surface.

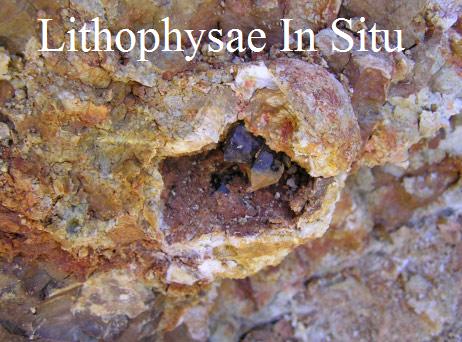
The clay is derived from an Eocene rhyolite flow. Over the past 40-odd million years, the rhyolite has decomposed to clay. The smoky quartz crystals formed in lithophysae, aka: thundereggs. The clay shows the sub-horizontal banding of the original rhyolite, and varies from a moist, elastic, dense medium that sticks to your shovel, to a hard adobe like substance. Depending on recent rainfall, the hole starting process can take from a day to a week.

Once you dig through the surface clay, the material becomes more uniform. About 5 ft. down is a red clay zone that marks the beginning of the lithophysae-bearing area. Fossicking areas require that only hand tools be used, so we set up a hand-powered rope windlass to haul the muck out of our hole. As the hole deepens, more time is required to remove each round of waste. In a week we were down 10 ft; by the end of the second week, 16 ft. Muck leaves the hole by windlass. An hourʼs digging in a 10 X 10 ft. hole requires 20 minutes of hoisting buckets.

As we continued down, we encountered layers where lithophysae were abundant. Collecting crystals is a lot slower than digging clay, so our downward progress slowed. The third week we only dug 4 ft. of muck, but produced over a thousand crystals. Every evening we cleaned our daily take of ʻeggsʼ, at least enough to judge the quality of the crystals found.

During our third week, we struck a layer of large eggs, up to a foot in diameter. Eggs this large are uncommon at Mooralla. In the photo, you can see the normal-sized
eggs (+/- 3 inches) in the pink clay band above, with the larger eggs below in the grey clay horizon. The pick head is 10 inches. At least 50% of the smokies are double terminated. Fast growth (vapor phase) caused frequent inclusions and enhydros to form within the crystals.

It is hard to imagine how the crystals formed in these lithophysae, as they are so densely packed there is little room for the clay. Almost every egg, even tiny ones, will have at least one smoky, usually sitting on a bed of small, clear quartz druse. Larger eggs will contain multiple plates of smokies attached to thin shells of silicified rhyolite. Opening a large egg is like peeling an onion.

That week I returned to Melbourne to pick up a group of visitors from the U.S. & Canada; they had the experience of digging out one egg after another. When the eggs are widely separated, it is easy to pop them out with a deft swing of a pick, but when they are tightly packed, much delicate work is required to avoid damaging the crystals.

During our 4th week, the rainy system that had caused floods in Queensland reached Victoria. Working the hole in the rain is normally no problem, as the large tarp shunts the water away from the hole. Walking between camp and the hole can be an adventure, as the clay ground surface is extremely slick, and your boots quickly accumulate many pounds and inches of gooey clay.

After 3 days of nearly-continual rain, we decided that maybe a visit to town was in order. The access to the locality requires fording two creeks, normally dry in November. The first time I looked, there were 6 inches of water in the creek. The second time, 2 hours later, the creek was 18 inches deep and moving quickly. Since my flight home was scheduled later that week, it seemed a good idea to make a run to town. Was glad we did, as 2 days later our camp area was submerged. The zone in the bottom of the hole was encouraging, weʼll return to dig it back out another year.
-Bob Jackson

Tuesday, April 5, 2011

Retina Scorchers Part II


I have too many flower photos! Here are a few more just to fill up the day. Click on individual photos for larger view. Acacia redolens is a low growing hardy drought tolerant shrub that has millions of yellow puff ball flower this time of year.


Another crowd pleasing shrub is pink raphiolopus, which is planted all over the place in parking lots and other difficult landscaping areas. It's a survivor and this time of year, it becomes saturated with pink flowers.

The bouganvillea plants are just starting to bloom now as well. They come in many colors like red, violet and purple. This one is a red violet color. Bouganvillea will bloom for the entire warm season. It's flowers are not true flowers but instead are modified leaves that change color at the end of the stalks for an exquisite display of vibrancy.

Dangling clumps of purple wisteria are just starting to emerge from their pods at this time. Eventually, these beautiful danglers will turn to seed pods that will wait until a windy day in fall at which time they will snap open violently and their seeds will eject all over my yard. On that day, I will hear the snapping sound all day as these pods intermittently explode. And once the rains come, seedlings will begin to sprout in all manner of odd places.

On the flip side, the wild lilac season is just coming to a close right now. Chaparral hillsides in this area experience several weeks of intense blue color as the wild lilac bushes push out their blooms. These wild children need no water once established and grow naturally all around me. In addition, many cultivars are planted as landscape. In the photo, you can see a large tree like bush of lilac in full bloom with Sesame Pooch lounging below the trunk, and a close up view of the flowers in the photo just down and to the right of the larger photo.

The large tropical leaves and bright orange tongues of the Bird of Paradise flower seem to please men the world over. Every man I've known has liked this flower but could not say exactly why. This bush grows readily in San Diego county.

Another classic flower is Vinca with its picturesque chiseled blue flowers. Vinca is a hardy drought tolerant vine that grows well in shade, unlike most flowers that instead like sun.

Part one of Retina Scorchers is here.

I've spent a lot of time viewing flowers lately, but I miss my rocks! Luckily, Dave told me yesterday that he found a new nearby location that has small garnets and aquamarine crystals! Hopefully, we will be able to go there again on Saturday so I can get me some good pictures and specimens!

Monday, April 4, 2011

Retina Scorching Flowers of San Diego


The flowers around my house have exploded. Color is everywhere. Click on photos for a larger view and bare with me as I can't resist posting some photos of our local flowers that grow well in this area. If you choose the right plant for its environment, it will thrive with little care.


One of the local favorites is this vibrant fluorescent lavender ice plant (top left), the flowers of which have such an intense color that they could easily be mistaken as fake. During flowering season, it creates a carpet of color that can be seen for miles. Bright lavender is the most common color but a bright red type can also be found and in this photo (2nd down on left), they grow side by side.


But the classic California flower had got to be the California poppy which in the right season will cover the hills in orange and gold. Here is a closeup view of one poppy plant (top right) with multiple floppy four lobed flowers. However, apparently at this current time, all of the fields of gold that I found turned out to be caused by a different flower, the vibrant African Daisy (2nd down on right) which looks like fields of gold from far away (3rd down on right), but turned out to look quite different from poppies close up. They only share a common color.


Another common appearance here along the hillsides are bright fuzzy splashes of orange floating on top of other plants (3rd down on left). These orange vines (4th down on right) in the photo are not flowers at all but in fact are a parasitic vine called Dodder which first sprouts and grows as a normal plant but then must quickly find a host plant to feed from. It wraps it's tendrils around the host plant and derives all of its nutrients from that plant.


Dodder in our area seems to grow mostly through the winter and spring and then die back for the rest of the year, corresponding with the typical wild plant growing season here in San Diego where winter brings much needed rainwater but no snow except for in the highest elevations.

Other common sights during this time of year include delicate clumps of white flowered sweet alyssum (4th down on right), red rods of fluffy bottle brush (bottom right) hanging in profuse numbers from their trees, and hillsides of bulging purple Status, which are especially excellent as dried flowers (5th down on right and bottom right).

See Part II of Retina Scorchers here:Rockchaser: Retina Scorchers Part II